
Shader Graph Tutorials: Dissolve Shader
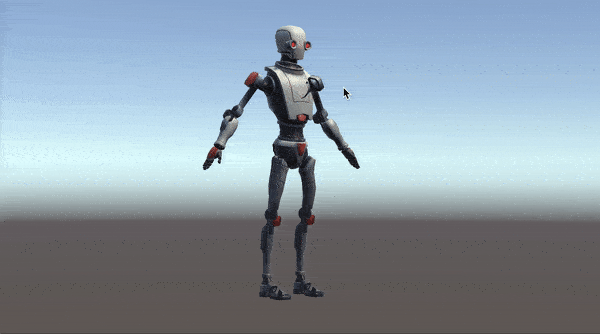
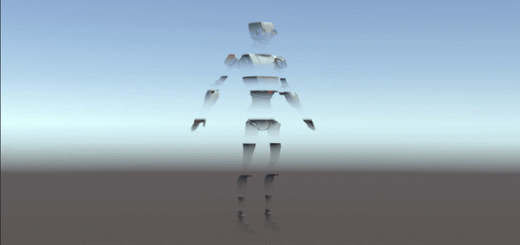
In this tutorial, we are going to create a dissolve shader in Unity3D using Shader Graph. At the end of the tutorial, we are going to obtain the following result:
In this tutorial, we are also going to learn two new nodes while creating the dissolve shader. These two new nodes are Step Node and Simple Noise Node. In addition, we are going to see how we can access and modify shader properties in run-time by using C# scripts.
This article requires some basic knowledge about shaders and shader graph tool in Unity3D. If you are not familiar with Shader Graph, you can follow this link to see our Shader Graph Tutorials for Unity3D Developers tutorial series. This article is also a part of this series.
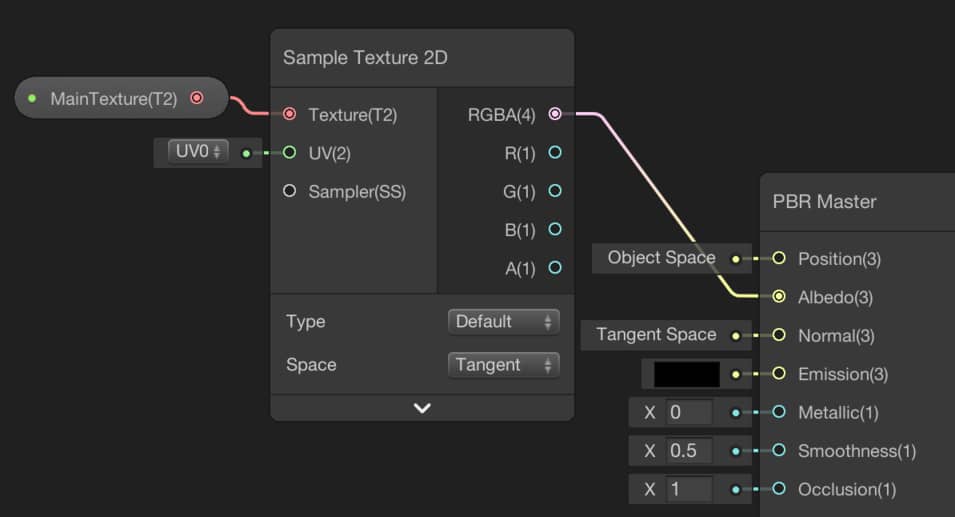
As usual, we begin with adding Main Texture property and Sample Texture2D Node and connect it to the Albedo port of the PBR Master Node.
Simple Noise Node
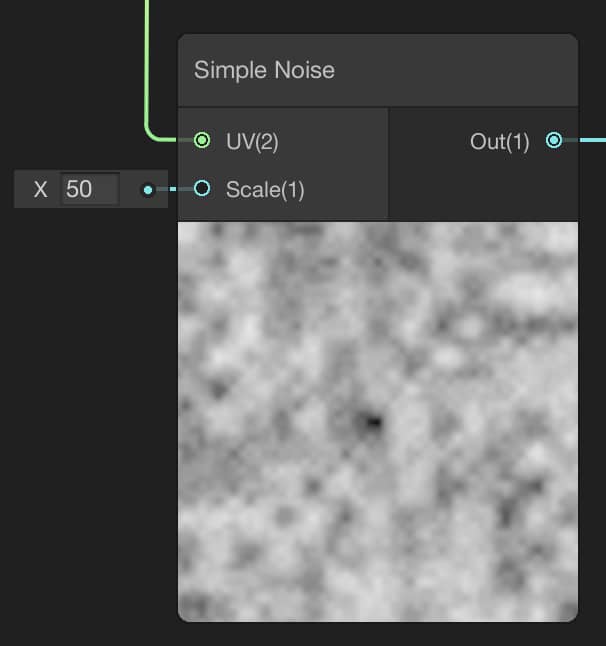
Simple Noise Node generates a procedural simple noise based on the given UV input. In Shader Graph, there are two more predefined noise nodes that you can use in your shaders. They are Gradient Noise and Voronoi.
Here, we use Simple Noise Node as a Mask Texture. In our previous Hologram Shader Tutorial, we used a mask texture in order to set the transparency value of the corresponding pixels. But this time, assume that we are using a procedurally generated texture instead of a pre-created texture.
Add a Simple Noise Node to your scene. And set the Scale value to 50.
Step Node
Basically, Step Node is a kind of comparison node. It compares a given value with another value and gives an output. If the given value is greater than the Edge value, the output of the Step Node is 1, otherwise 0.
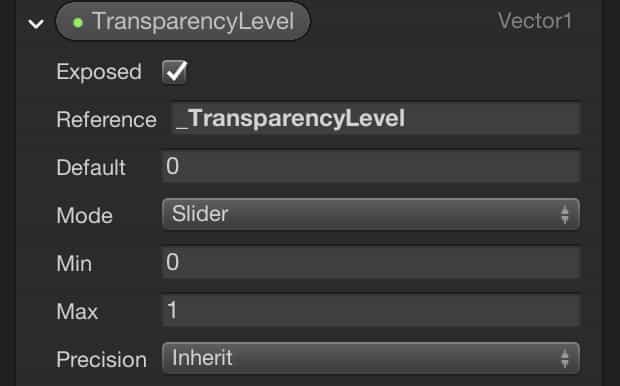
Add a Step Node to your shader and create a TransparencyLevel property which will get a value between 0 and 1. Connect the output of the Simple Noise Node to In port and also connect the TransparencyLevel variable to the Edge port of the Step Node.
Finally, we will connect the output of the Step Node to the Alpha port of the PBR Master Node.
Your shader should look like this:

Let me explain what is going on here. Our Simple Noise Node creates noise and maps it to the surface of the 3D model. Therefore, each fragment on the surface of the model has a value between 0 and 1. If a pixel’s value is greater than the TransparencyLevel then that pixel’s alpha value will be 1 and if it is smaller than TransparencyLevel, it will be 0. In other words, the corresponded pixel will be rendered or will not be rendered. For instance, assume that the TransparencyLevel is 0.3. In this case, the fragments that have a value, which is generated by the Simple Noise Node, greater than 0.3 than those pixels will be rendered. And those pixels that have a value of smaller than 0.3 will not be rendered and they will be transparent.
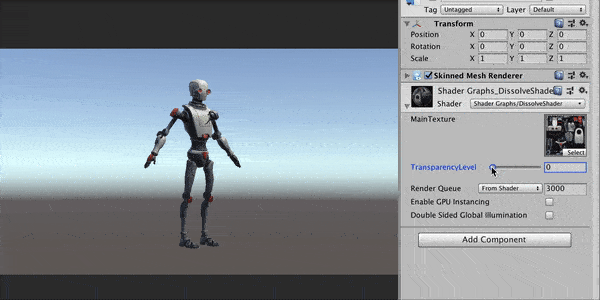
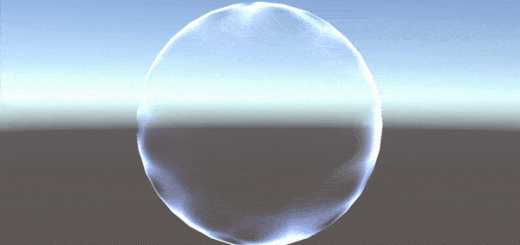
Save the shader and create a material for this shader and assign it to your model. In the material inspector, you can change the value of the TransparencyLevel. While you are changing it from 0 to 1, you should see the following.
Accessing Shader Properties from C# Scripts
We can access and change shader properties in runtime from C# script. In this part of the tutorial, we are going to access our dissolve shader, and by changing TransparencyLevel, we make our model dissolve when the mouse pointer is over the object.
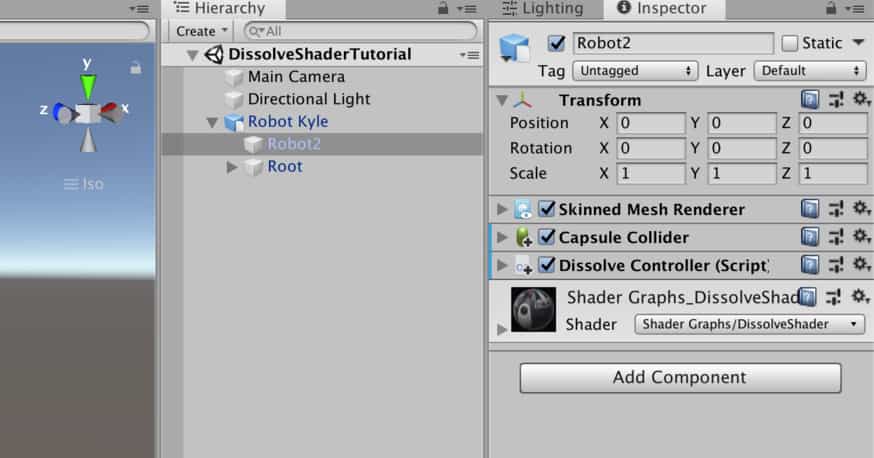
Let’s create a DissolveController script and attach it to the object which has the renderer component. In order to access material properties, we have to access the renderer component first. Furthermore, we have to add a collider to this object since we want to detect if the mouse pointer is over the object. Our inspector should look like this:
We need a float variable which we will set 1 when the mouse pointer is over the object and 0 when the mouse pointer is not over the object. In order to detect if the mouse is over the object or not, we may use OnMouseEnter and OnMouseExit methods.
using System.Collections;
using System.Collections.Generic;
using UnityEngine;

public class DissolveController : MonoBehaviour
{
    private Renderer rend;
    private float transparencyLevel;

    void Start()
    {
        rend = GetComponent<Renderer>();
    }

    private void OnMouseEnter()
    {
        transparencyLevel=1f;
    }

    private void OnMouseExit()
    {
        transparencyLevel = 0f;
    }
}
In order to access shader properties, we have to determine their reference names. For example, here, we will change the reference of TransparencyLevel as follows:
When the mouse is over the object, we will get the instantaneous TransparencyLevel value of the material and increase it up to 1 and when it is not over the object vice versa. In order to do this, we need to add the following lines of code into the Update() method.
    void Update()
    {
        float currentValue = rend.material.GetFloat("_TransparencyLevel");
        rend.material.SetFloat("_TransparencyLevel", Mathf.Lerp(currentValue, transparencyLevel, Time.deltaTime));
    }
Our final script should look like this:
using System.Collections;
using System.Collections.Generic;
using UnityEngine;

public class DissolveController : MonoBehaviour
{
    private Renderer rend;
    private float transparencyLevel;

    void Start()
    {
        rend = GetComponent<Renderer>();
    }

    void Update()
    {
        float currentValue = rend.material.GetFloat("_TransparencyLevel");
        rend.material.SetFloat("_TransparencyLevel", Mathf.Lerp(currentValue, transparencyLevel, Time.deltaTime));
    }

    private void OnMouseEnter()
    {
        transparencyLevel=1f;
    }

    private void OnMouseExit()
    {
        transparencyLevel = 0f;
    }
}
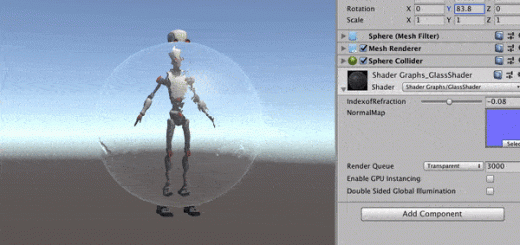
And this is the final result of our dissolve shader.
Great tutorial. I was looking for this exaxct effect in Shader Graph to expand upon.
Great tutorial. i really loved it. This is perfect for beginners who really like the visual effect part of games. Thanks a lot.
Perfectly explained, but I have a question… Why we don’t assign UV(2) port at Simple Noise Node? It also has a dropdown menu, UV0, UV1, UV2, and UV3, can you explain what’s that mean? Thanks in advance.
Generally, meshes come with a UV assigned. UV is used for texture mapping. Every point on the surface of the object mapped on the UV. Simple noise node takes two parameters(UV and Scale), generate noise and map generated numbers to every point on the UV. I haven’t used other options before but as far as I know, meshes supports up to four UVs assigned to a mesh. Usually, there is only one but if there are more than one, you select from that menu.
Another thing to mention, you can manipulate the pre-assigned UV in runtime. As an example try to add a Twirl Node and connect its output to UV input of Simple Noise Node and observe the dissolve behavior.
Thanks for the explanation. I’ve tried adding Twirl Node, it looks like it has “cut and slice” pattern xD
You are welcome. 🙂
I’m not understanding the different between a step node and a similarly configured comprison node. Don’t they do the same thing? What’s the point of the step node?
Yes, you are right. They are the same thing. You can use both of them to compare values.