
How to make the camera follow an object in Unity3D
In this tutorial, we are going to learn how we can make the camera follow an object in Unity3D using two different methods. The first one is by writing a script that updates the position of the camera according to position of the object. The second one is using Cinemachine component of Unity3D.
A Little Bit Vector Algebra
Before we start writing our CameraFollow script, first we need to review our knowledge about vectors a little bit. If you are already familiar with vector algebra, you may skip this part. As you probably know, we represent positions of objects in Unity3D using vectors. In 2D space, we need 2 numbers to represent a position. Likewise, for 3D space, we need 3 numbers. To make it simple, for now, we are going to study in 2D space first, then move our discussion to 3D space.
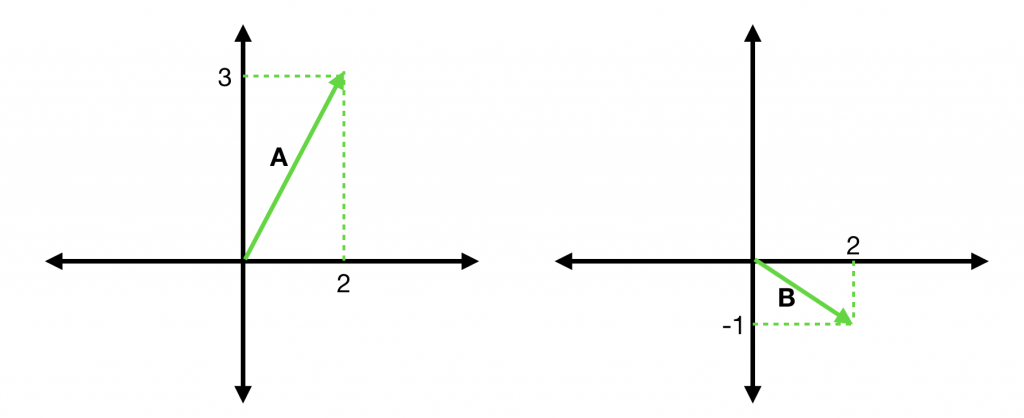
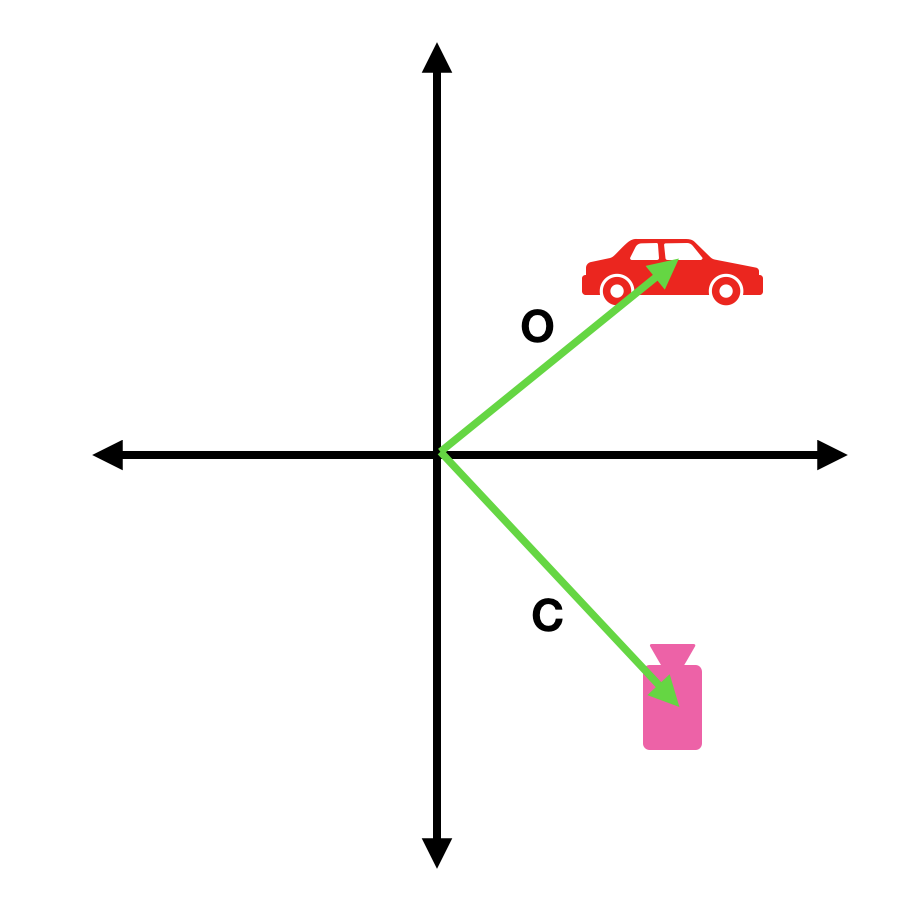
As we mentioned above, in 2D space we need two numbers to represent a position. For instance, A=(2,3) represents a point on 2D space such that 2 units on the x-axis, and 3 units on the y-axis. In the same way, B=(2,-1) represents another vector.
Vectors are cool mathematical objects that you can perform several mathematical operations like summation, subtraction, different kind of multiplications, etc. If you would like to deep dive into game development, you should definitely be comfortable if you are not familiar with them. But for this tutorial, we are only going to cover basic operations.
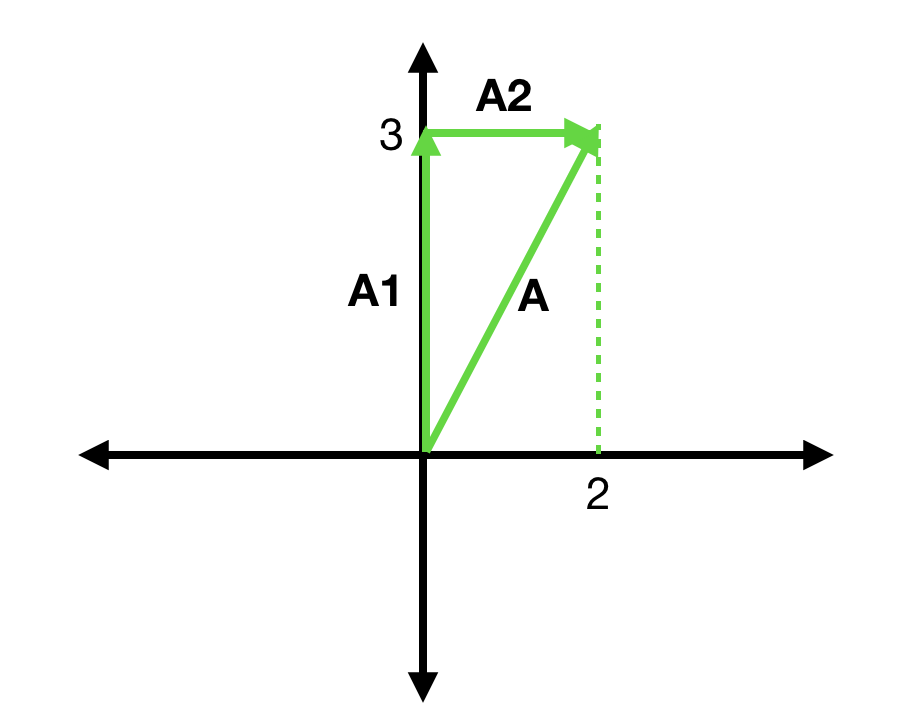
Assume that you are at the center of the coordinate space. This point is called as the origin. And the coordinates of the origin are (0,0) in 2D space. Now assume that you are walking on the vertical axis to the up direction( i.e y-axis) by 3 units and then in the right direction by 2 units. Your final position will be the point (2,3). Alternatively, you can walk along the A. The final position will be the same. Let’s say A1=(0,3) and A2=(2,0). As you may notice we can represent vector A as the summation of two vectors, A1+A2. When we want to sum two vectors, we sum the first components and obtain the first component of the final vector. Likewise, we have to add the second component of two vectors to obtain the second component of the final vector.
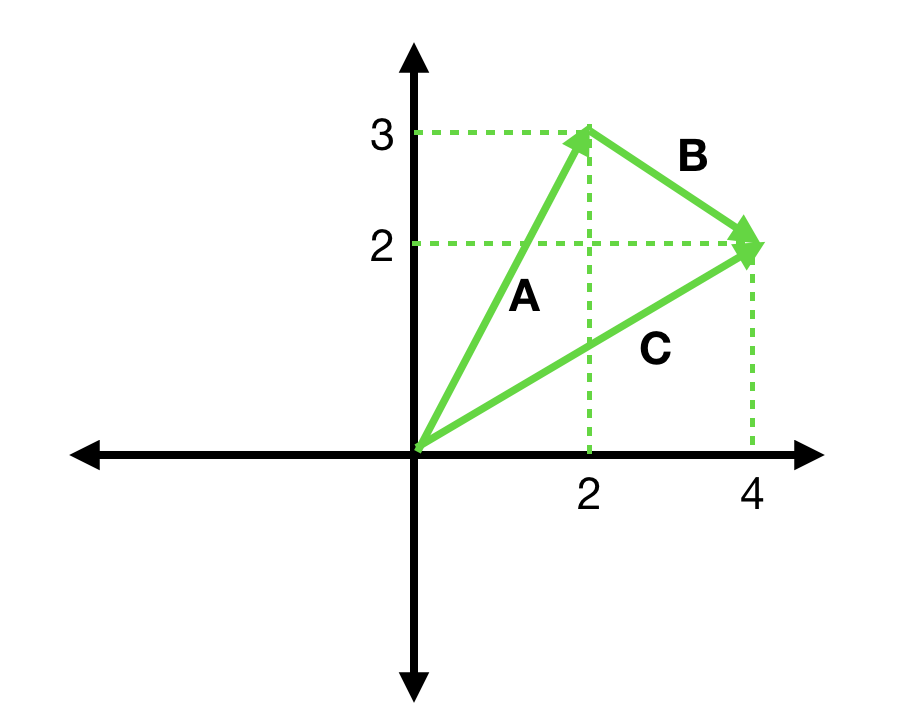
Similarly, we can add any two vectors to obtain a third vector. For instance, if we add vector B to vector A, we get C which represents another position in the 2D space.
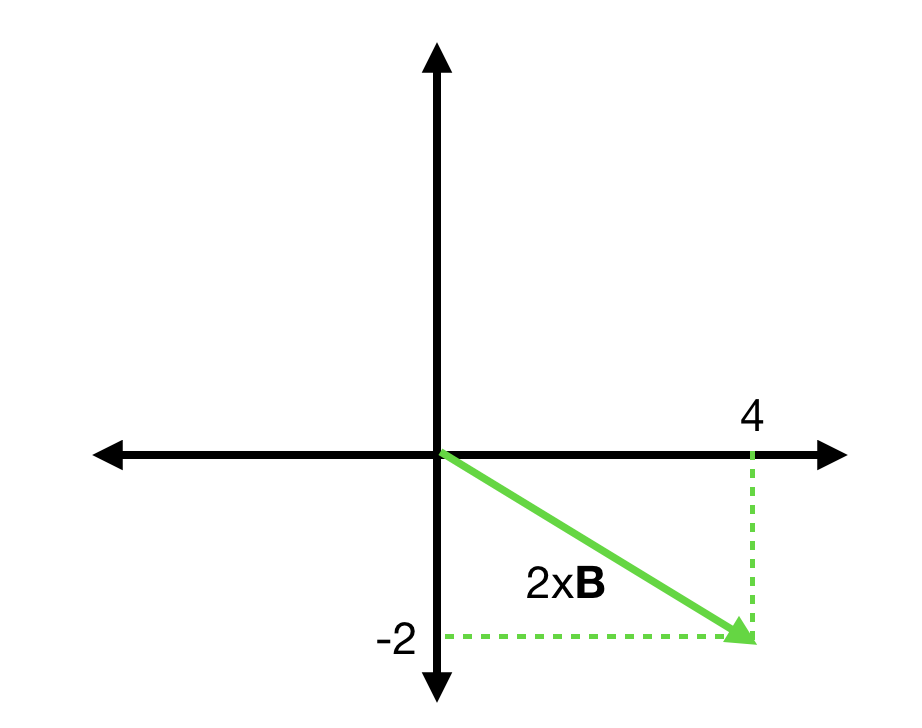
In addition to summation, we can multiply vectors by numbers (furthermore, you can multiply a vector with another vector but this is out of our interest, here). For instance, we can multiply vector B by 2. In this case, we will get a vector that is represented as (4,-2). Furthermore, you can multiply a vector with a negative number. For example, if you multiply B with -1, then you will get (-2,1).
All of our discussion here can be generalized to higher dimensions. All the mathematics is the same for 3D space also.
Up to now, we made a review of the basics of vector algebra and we are going to use these operations while we are writing a camera follow script.
Following an Object using CameraFollow Script
First, we will start with a basic script then we will make it better. Let’s start.
Assume that we have an object at some position in our scene. Let’s say the position vector that represents its position is O. And we have a camera that is located at some point in the scene that is represented by a position vector C.
Our aim is to update the position of the camera according to the object’s position. Therefore, we have to determine the position of the camera according to the object’s position. To do this, we need the position vector from the object to the camera. We can obtain this relative position vector by subtracting O from C:
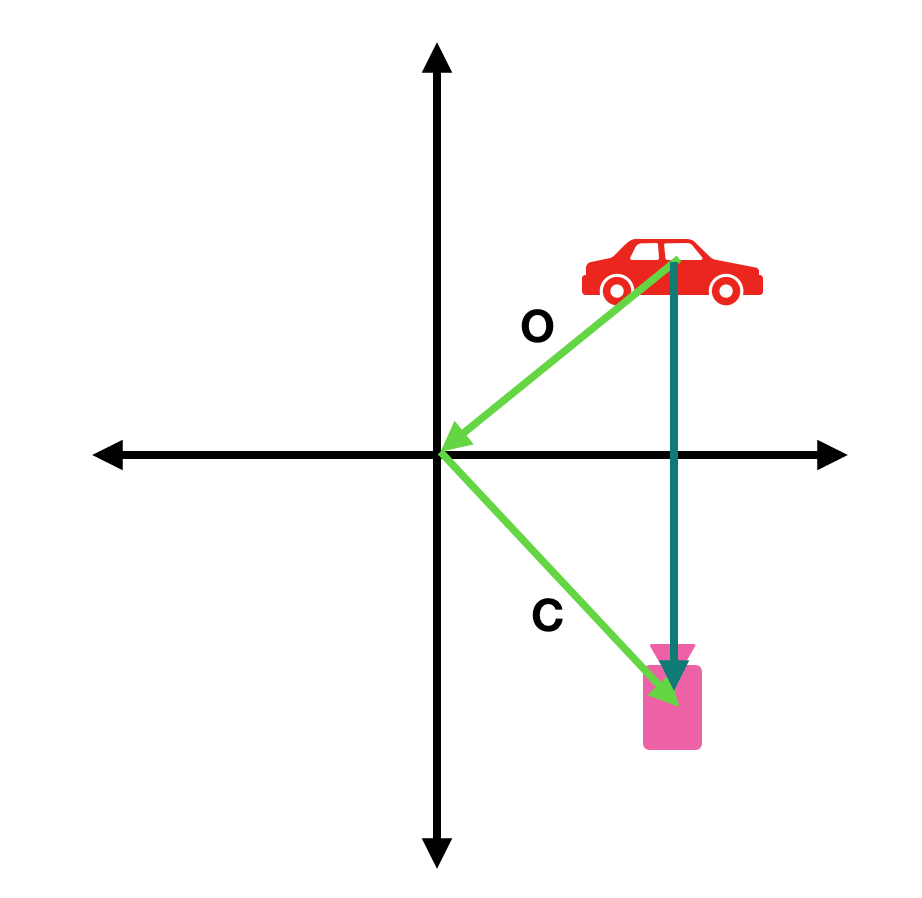
Therefore, we can determine the new position of the camera by adding this relative direction vector to the object’s instantaneous position.
Create a new script and change its name to CameraFollow. Assign this script to your main camera.
using System.Collections;
using System.Collections.Generic;
using UnityEngine;

public class CameraFollow : MonoBehaviour
{
    public Transform targetObject;
    private Vector3 initalOffset;
    private Vector3 cameraPosition;

    void Start()
    {
        initalOffset = transform.position - targetObject.position;
    }

    void FixedUpdate()
    {
        cameraPosition = targetObject.position + initalOffset;
        transform.position = cameraPosition;
    }
}
As mentioned above, we get the relative position vector by subtracting the target object’s initial position from the camera’s initial position. We add this offset vector to the object’s position vector to find the new position vector of the camera. Do not forget to assign the target object into your script from the inspector.
We can make it smoother if we use the Vector3.Lerp method. Lerp method is used for linear interpolation. If we update the position of the camera with a delay, we will obtain a smooth movement. If you add a smoothness variable, you can control the delay.
public class CameraFollow : MonoBehaviour
{
    public float smoothness;
    public Transform targetObject;
    private Vector3 initalOffset;
    private Vector3 cameraPosition;

    void Start()
    {
        initalOffset = transform.position - targetObject.position;
    }

    void FixedUpdate()
    {
        cameraPosition = targetObject.position + initalOffset;
        transform.position = Vector3.Lerp(transform.position, cameraPosition, smoothness*Time.fixedDeltaTime);
    }
}
Let me explain linear interpolation for those who are not familiar with. Linear interpolation is a method that returns a value between two values. In the Vector3.Lerp method, we used three arguments. The first and second ones are position vectors and the third one is the interpolation value. Assume that the first vector is a zero vector and the second vector is (1,0,0). If the third value is 0.5 then Vector3.Lerp method will return a vector (0.5, 0, 0). Likewise, in our CameraFollow script, we used smoothness*Time.fixedDeltaTime. Therefore, in each FixedUpdate() method call, the position vector is updated a small amount. This will create a smooth movement.
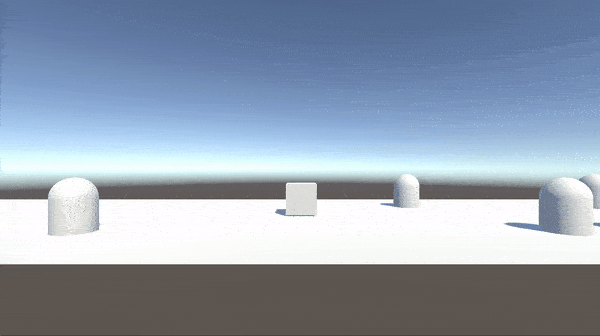
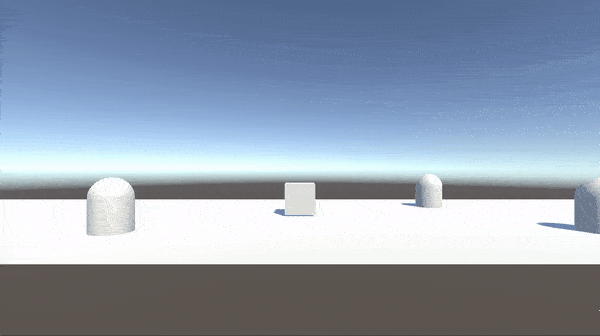
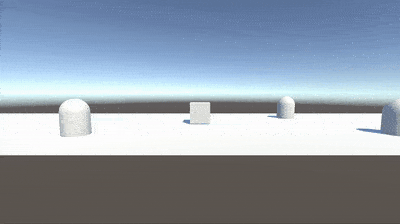
And this is the result:
Let’s take our script a step further. Now, we would like to specify a few coordinates relative to the target object and switch the position of the camera to these specified coordinates.
To do this, we can declare an enum and therefore when we want to switch the relative position, we can specify one of the selections.
public class CameraFollow : MonoBehaviour
{
    public float smoothness;
    public Transform targetObject;
    private Vector3 initalOffset;
    private Vector3 cameraPosition;

    public enum RelativePosition { InitalPosition, Position1, Position2 }
    public RelativePosition relativePosition;
    public Vector3 position1;
    public Vector3 position2;

    void Start()
    {
        relativePosition = RelativePosition.InitalPosition;
        initalOffset = transform.position - targetObject.position;
    }

    void FixedUpdate()
    {
        cameraPosition = targetObject.position + CameraOffset(relativePosition);
        transform.position = Vector3.Lerp(transform.position, cameraPosition, smoothness*Time.fixedDeltaTime);
        transform.LookAt(targetObject);
    }

    Vector3 CameraOffset(RelativePosition ralativePos)
    {
        Vector3 currentOffset;

        switch (ralativePos)
        {
            case RelativePosition.Position1:
                currentOffset = position1;
                break;

            case RelativePosition.Position2:
                currentOffset = position2;
                break;

            default:
                currentOffset = initalOffset;
                break;
        }
        return currentOffset;
    }
}
Following an Object Using Cinemachine
In the second part of this tutorial, we are going to see how we can follow an object using the cinemachine component. First, we need to download and import the cinemachine from the asset store. If you have problems with importing cinemachine, you may need to restart Unity.

Add the Cinemachine Brain component to your main camera. Cinemachine Brain is the control point for the virtual cameras that we will create.
Now we can create several virtual cameras, control the behaviors of them and switching between them. But for this tutorial, we will create only one virtual camera to show how we can make the camera follow an object.
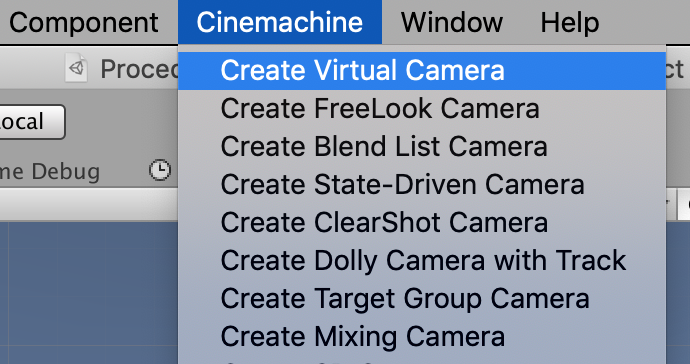
Create a virtual camera from the Cinemachine menu.
Click on the newly created virtual camera. Arrange your camera position, rotation or other settings as if it is your main camera. Then assign your target object to the Follow slot. If you would like to rotate your camera according to your object, you can assign it to Look At slot, also.
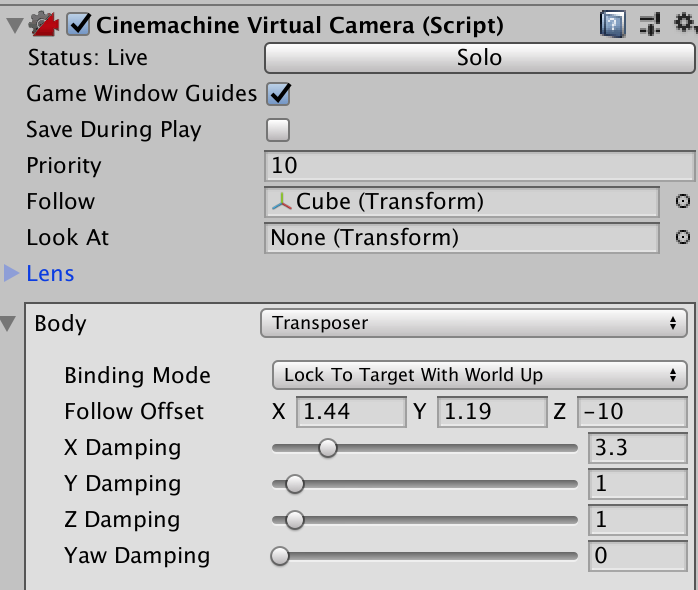
You can fine-tune the delay of the camera behind the movement of the object by changing damping values in each direction.


THANKKKSSSSSSSSSSSS YOU KİNG